
Wednesday, April 30, 2008

Banana Chocolate Chip Mini-Muffins

I had leftover over-ripe bananas and I just made banana bread last week and wanted to try something different. I'm usually not a huge fan of banana in baked products (aside from banana bread) because it tends be too sweet. I don't like the sort of fake banana flavor that you get in store bought banana muffins. But these came out great. Sweet, but not too sweet, with delicious banana overtones. And of course, chocolate.
I found the recipe here and made a couple of changes. I didn't have plain yogurt, so I used vanilla instead and left out the extract. I added a dash of cinnamon and chopped up some regular sized semi-sweet chocolate chips. These muffins were a big hit. And it made our apartment smell absolutely wonderful.
Banana Chocolate Chip Mini-Muffins
from Ruskin girl at grouprecipes.com with mods
Makes 24 mini-muffins
2 small, ripe bananas
3/4 cup low-fat vanilla yogurt
1 1/2 cups flour
1 1/2 tsp. baking powder
1/4 tsp baking soda
1/4 tsp salt
1/2 tsp cinnamon
5 TBS unsalted butter, softened
1/2 cup sugar
1 large egg
3/4 cup semi-sweet chocolate chips, chopped fine (or you can use mini chips)
1) Set oven rack to the middle of the oven and preheat to 425ºF
2) Spray a 24-cup mini-muffin pan with cooking spray
3) Mash banana and yogurt together in a small bowl. Set aside.
4) Combine flour, baking powder, baking soda, cinnamon, and salt in a medium bowl. Set aside.
5) Cream together butter and sugar until fluffy using an electric beater on low. Add the egg and beat at medium speed until creamy.
6) Add 1/3 of the flour mixture to the bowl and beat on low until incorporated. Then add 1/2 of the banana mixture and beat until incorporated. Continue alternating, ending with the flour mixture. Fold chocolate chips into batter.
7) Using a tablespoon, fill each mini-muffin cup to the top with batter (this fit perfectly). Bake for 12 - 14 minutes or until turning golden brown around the top and edges.
8) Allow pans to cool slightly on wire rack. Then remove the muffins from the pan and allow them to finish cooling on the wire rack.
Tuesday, April 29, 2008
Unceremonious Steak with Balsalmic Vinegar

[This conversation took place between myself (obviously) and my dear friend Dallas who lives in said city and is my might-as-well-be-big-brother. This conversation certainly didn't take place during the work day. Never.]
Dallas: I made a very good dinner the other night which I will now recommend for you. Balsalmic steak. Yum!
me: ooOooOO. That sounds tasty!
Dallas: You'll need to be comfortable with red meat - are you comfortable with red meat?
me: um, yes
Dallas: It's like chicken, only from a cow- and with blood.
me: dude, i love steak! you took me to Ruth's Chris, recall?
Dallas: I do recall. That's when I met what I didn't-know-at-the-time would become your husband. If I'd have known, I would have expected him to pay in way of wooing my vote for your suitor.
Dallas: Anyway- as for the steak, you'll need find some nice sirloin cuts, and trim. You know- take off unwanted fat.
me: right
Dallas: Then you must pound them, somewhat relentlessly. With a meat tenderizer. Not just a hammer or something. And maybe not relentlessly, so much as throughly.
Dallas: When you're done, you can cut the steak into several pieces. I bought M and I two steaks and ended up with about 7 or 8 pieces.
me: mmm. I have a meat tenderizer thingum i think. With the spikes
Dallas: Now, throw them unceremoniously into a ziploc and add balsalmic vinegar, pepper, and a splash of worcester sauce. Seal and the marination will begin.
Dallas: After marinating for about an hour- you can cook. Apparently, you don't want to marinate too long. I cooked them in a frying pan, but a grill would work too.
Dallas: Then cook until they look as done as you want - adding pepper to taste.
me: mmm
Dallas: It turned out really good. I think you could also stand to add a little dill (not a lot!) to the marinade, for an extra kick.
Dallas: Of course, you'll have to guess on quantities. Like many of my recipes, I just kind of guess on how much I need. But my instructions are okay - especially the "unceremonious" way of tossing the steak into a ziploc bag.
me: it must be unceremonious. Can't be too much pomp and circumstance in the kitchen
Dallas: Exactly. So, I clearly now dub this recipe: "Unceremonious Steak (with Balsalmic Vinegar)"
me: mmm
Dallas: So now you can cook it for your honey.
me: i will! maybe this weekend!
And I did.
Unceremonious Steak with Balsalmic Vinegar
Serves 2
1 lb sirloin steak, about an inch thick
3 TBS balsamic vinegar
1 teaspoon Worcester sauce
salt and pepper
dill (optional--I did not have any on hand)
1) Slice steak in half lengthwise and then cut each half in half again (to make 4 pieces). Pound each piece to about 1/4 inch thickness with a meat tenderizer.
2) In a ziploc bag, combine vinegar, worcester, salt and pepper to taste, and dill, if using. Toss the steaks "unceremoniously" into the bag and seal. Press the marinade into the meat. Refrigerate for 45 minutes (really, don't marinate for too long. this marinade is VERY strong).
3) Heat a grill pan/cast iron skillet/non-stick skillet. Remove steaks from bag and discard marinade. Grill/pan fry steaks to desired temperature (I like mind well-done so it was about 4 minutes per side).
Sunday, April 27, 2008
Chocolate Walnut-Date Balls

I know this is a little late, since Passover ended on Saturday, but I brought these to the family seder and they went over pretty well! They were much richer than I expected.
I spotted the recipe in the Washington Post and, inspired by my dear friend over at My Achy Bakey Heart who has been baking up a ball storm, I decided to try them out.
However, I first didn't get the right kind of dates, then I didn't get ENOUGH dates, so I supplemented with dried apricots, which was actually pretty good as well. I've attempted to adjust the amounts of ingredients according to the standard package of dates I was able to find in the store. If you find your mixture is too dry, add more dates. Too sticky? Add more nuts. I'm sure you could do this with any kind of nut/dried fruit combination you'd like.
Chocolate Walnut Date/Apricot Balls
from Vered Guttman and the Washington Post with mods.
Makes about 18 balls
6 - 8 oz dark (semisweet or bittersweet) chocolate chips
8 oz package of whole, pitted dates or apricots
2/3 cup walnut halves (toasted, if desired)
1) Place the dates/apricots in a food processor and pulse until fine. Transfer to a small mixing bowl.
2) Place walnuts in food processor and pulse until finely chopped. Reserve a tablespoon of some of the more powdery nuts. Transfer the rest to the bowl with the fruit. Press nuts and fruit together, until thoroughly incorporated.
3) Line a baking sheet with parchement paper. Pinch off pieces of the walnut/fruitmixture and roll into 1 inch balls. Place on baking sheet.
4) Fill a medium saucepan with about 1 inch of water. Bring to a boil. Place a double boiler or a stainless steel mixing bowl over top of the pot so that it fits snuggly, without touching the water. Add chocolate chips to double boiler and melt until smooth, stirring frequently. Turn off the heat.
5) Working one at a time, drop the balls into the chocolate and coat with chocolate (I found rolling them around with a spoon helped). Once thorougly coated, transfer back to the parchement lines baking sheet. Sprinkle with reserved nuts. Allow to set completely (about 2 hours at room temperature*). Store in an airtight container.
*I am sure you could also transfer these to the refridgerator to set. But it was easy enough for me to just leave them out.
Saturday, April 26, 2008
Asparagus and Sausage Risotto

Whenever I mention to people that I love making risotto, they always give me this look and say "Well isn't that really time consuming" or "Wow, you must REALLY like to cook." Well yes, I do like to cook, and yes, this is no insta-meal. However, it only takes about 30 minutes if you're just patient and know what to look for. So to prove to you that I'm right (because I am) I spent extra time taking step-by-step photos.
Of course, I did all this before I realized that Pioneer Woman was going to post something so similar (and with much prettier photos). Her risotto looks quite tasty as well. Mine will show portions for two and also what to do if you're adding extra ingredients. It also has about a bajillion photos (and thanks blogger for making uploading and positioning pictures a real pain). Note: You can apply these guidelines to any kind of risotto. For the most part, just add your pre-cooked ingredients to the end. Want some other risotto ideas? See here.
Also, if you know how to make blogger do expandable post short-cuts without making it add "Read More" links to all previous posts, PLEASE let me know. It's been driving me crazy.

Okay, so here it goes! Click here to dig in!


The line-up!
Asparagus and Sausage Risotto
Serves 2
1/2 cup arborio rice
2 - 3 cups chicken broth
1 TBS olive oil
1 large shallot, chopped fine
1 - 1 1/2 cup asparagus, steamed and chopped into 1" pieces
1 link pre-cooked chicken sausage, sliced thinly
1/4 cup frozen (or fresh) peas
1/4 cup white wine
1/4 cup grated parmesan cheese
1 TBS butter
a splash of light cream
salt and pepper to taste
1) Pour chicken broth into a small sauce pan. Bring to a simmer. Lower heat, but keep warm. We're going to be adding this to the risotto as we go along.

2) Heat oil in a medium sauce pan, over medium heat, until it shimmers.

3) Add shallots to the hot oil. You can use onions instead, if you'd line, but I'm starting to have this love affair with shallots because they have this delicious subtle sweetness to them.

Sauté until translucent.

4) Add risotto to the pan. Stir until coated. This slows down the absorption process and gives the rice a slight nuttiness.
5) Add white wine to deglaze pan. Stir until most of the wine is absorbed. The rice should start to feel a little sticky.

6) Okay, now we're going to start adding the broth. I usually add the most at the beginning and then smaller amounts as we go along. I usually start with about a cup of broth.

Now we're going to start stirring. According to many risotto experts, one needs to be stirring "constantly." I usually stir more like "often." You do sort of need to hover near the stove and keep an eye on things, but you don't need to be stirring every second.

You want to keep your eye on the heat level. I usually leave it at this low simmer over medium to medium-low heat. You don't want the rice to absorb too quickly/boil off the liquid or it won't really cook right. And hey look, I'm not stirring!

This is what the rice will look like about 10 minutes in. See how it's starting to puff up and turn opaque? If you tried a grain right now it would be still mostly raw and kind of crunchy. You'll also notice there's very little "creaminess."

See how the liquid is being absorbed and starting to make the rice kind of creamy? You'll notice when you stir that the mixture will feel thicker and the rice will start to stick a little to the bottom and sides of the pan. Time to add more broth!

I added about 1/2 - scant 1 cup of broth. Depending on the brand of rice you get, you may need more broth, you may need less. Same deal if, say, you had the heat on too high when you started. So I usually try to keep an extra cup of broth handy. Hot water will work in a pinch.
Let's take another look at the risotto itself. We're not about 20-25 minutes into the cooking process. See how it's softer and we're starting to get that "creaminess" from the starch that's been released from the grains? Lets give it another stir...

Most of the liquid has been absorbed and there's more of that creaminess in the pot. If you try a bit now, it should be a little too "al dente" meaning almost tender, but with a bit too much of a crunch. Right now, we want it to be tender and firm, sure, but not crunchy. However, this point in time heralds the coming of additional ingredients!
*Trumpets Sound!*

Add another 1/2 cup of broth (sorry about the flash folks)

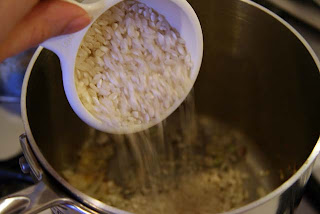
6) Time to add the asparagus...

... chicken sausage...

... and peas!

Now we stir it all together. Isn't all that green pretty? This is going to cook for another 5 -10 minutes. You'll need to be a little more active about stirring now because there's so much stuff going on in here. I usually add whatever last splash of broth I have leftover to this beautiful mess.

Let's get another close up. The rice is opaque, soft, and now, if you taste it, tender. It should still have a firmness to it, a bit of chew, but it shouldn't be crunchy. Now just watch the amount of liquid in the pan. You don't want risotto soup.
Ah, perfect. There's some liquid left, but it's thick and kind of creamy. Don't worry if it's not super "creamy." Much of that will come from adding the cheese and, well, cream.


7) Turn off the heat and add salt and pepper.

8) Now we add that tablespoon of butter. Stir until melted and incorporated.

9) Then we add the cheese. And stir. Now. We could stop here. It will be plenty creamy and delicious, but I just happened to have some cream sitting around, all lonely like, in my refrigerator, so why not.

So lets add a splash of cream. Like 1/2 tablespoon. You really don't need it. But it's tasty.

Isn't that just gorgeous? I want to eat it. Off of my screen.

And this, this here is what it's all about. Your final product? Dreamy, creamy, cheesy, risotto deliciousness.

10) Serve it up with an extra sprinkling of parmesan. Just for good luck.
Wednesday, April 23, 2008
Banana Bread

I must say, there are few things more delicious and easy than banana bread. I’m not a huge baker, but quick breads I can handle. I find that the flavor of this can really be affected by the ripeness of the bananas. For a sweeter flavor, go with over-ripe bananas. For a more banana-y flavor, go with bananas at the peak of ripeness. I wouldn’t try this with under-ripe bananas, as I don’t think they would blend up well. I baked this in a pyrex dish for exactly 38 minutes and it came out perfect.
Banana Bread
Serves 2
1 cup sugar
½ teaspoon salt
1 teaspoon baking soda
½ cup shortening (you can substitute butter in a pinch)
2 very ripe bananas
2 eggs
1) Preheat oven to 350ºF.
2) Sift together the dry ingredients.
3) Whirl remaining ingredients in food processor.
4) Combine until dry ingredients are moistened.
5) Pour batter into greased and lightly floured 9x9 baking pan
6) Bake for 35-40 minutes, or until a toothpick comes out clean. Cool for 5-10 minutes.
Monday, April 21, 2008
Thai Noodle Salad with Chicken

Another recipe out of Cooking Light! This salad looks so beautiful, fresh and delicious. The original recipe calls for tofu rather than chicken, but we have yet to acquire a taste for tofu. The chicken came out wonderful with the marinade nevertheless. Unfortunately, the noodles came out undercooked. I might actually boil the noodles for a couple of minutes rather than just letting them soak in boiling water. Soaking them is great for stir-frying (see this fantastic Pad Thai recipe) but they were almost unpleasantly crunchy here. Mr. Heart was not a huge fan of the dressing, which he found too strong (which is odd because I'm usually the one to complain about dressings), so for once we had a split vote. I enjoyed this, though it had potential to be better. I'm thinking for next time making a peanut-sauce type dressing.
Thai Noodle Salad with Chicken
from Cooking Light with mods.
Serves 2
1 large chicken breast, cut into strips
2 TBS lime juice
1 TBS low-sodium soy sauce
1 tsp minced garlic
1/2 tsp red pepper flakes
1 tsp sugar
2 tsp grated fresh ginger
1 TBS canola or peanut oil
1/2 lb uncooked rice vermicelli
1 cup romaine lettuce torn into small pieces
1/2 cup shredded carrot
1/2 cup cucumber, sliced thinly
salt to taste
1/4 cup lime juice
2 TBS low-sodium soy sauce
2 TBS canola or peanut oil
1 TBS fish sauce
2 tsp sugar
2 tsp grated ginger
1/4 tsp salt
1/4 tsp red pepper flakes
1 tsp minced garlic
1) Combine first eight ingredients in a ziplock bag. Seal and marinate at room temperature for at least 30 minutes.
2) Heat a large non-stick skillet over medium heat. Add a tablespoon of oil to the pan and swirl to coat. Heat for thirty seconds. Add chicken and sauté for 5 -7 minutes until crispy, golden brown, and cooked through.
3) Prepare rice noodles according to package directions (something like cook in boiling water for 2 -3 minutes or until just tender). Do not over cook! Drain and rinse in cold water. Set aside.
4) Combine last nine ingredients in a measuring cup and whisk to combine to create the dressing.
5) Toss together lettuce, carrots, cucumber, and rice noodles in a large bowl. Add dressing, to taste. Toss to combine. Top with chicken and serve!
Coming soon!
Step-by-step photos of Asparagus Risotto
Banana Bread
Chocolate Walnut-Date Balls
"Unceremonious" Balsamic Steak
Saturday, April 19, 2008
I Heart... Honest Tea

I am a big tea drinker. Someday I will post an photo of my cabinet which entirely filled with tea. So needless to say, I'm a bit of a tea snob as well. Not as bad as some, but it means I don't touch Nestea or Lipton bottled tea with a ten-foot pole. Okay, maybe with a ten-foot pole, but only to knock it off the shelf and push it behind something where no one will find it and make the mistake of drinking it. The fact that it claims to be tea is... well, blasphemy. Most bottled "iced teas" are just not up to par.
However, Honest Tea is amazing. I love it for several reasons:
1) The company was founded and is located in my hometown. If I still lived there I would run to their offices and beg for a job just so I could get free cases of the stuff. And because I love them.
2) The name. Even though it took me 5 years longer than it should have for me to realize that Honest Tea = Honesty. Oh, you genius.
3) Totally organic, all natural ingredients, and very very little sweetener (in the form of cane sugar). And they are big into community, the environment, and fair business/trade practices.
The one thing that saddens me is that they no longer make my favorite flavor, Decaf Ceylon. However, I am now in love with their Sublime Mate (more puns! Sublimate? Sub-lime Mate? Oh Honest Tea...) and their Pomegranate Red Tea. Mmm. Not all of their flavors are my favorite, but they still rock my world.
They also now have Honest Ade and I seem to recall seeing something about them having loose leaf tea as well.
(The only comparable bottled tea is Harney & Sons new bottled iced tea and fruit beverages. They're a little sweeter than I would like and contain... *shudder*... citric acid. However, they'll work in a fix.)
Thursday, April 17, 2008
Rosemary-Orange Chicken over Spinach

This dish is from one of my favorite cookbooks, which I will blog about another time. It's called Preventions Ultimate Quick and Healthy Cookbook and I bought it at a used bookstore for $5 and I love it. However, this recipe made me very frustrated because the usual straightforward directions were mired in incomprehensibility:
"Using a sharp paring knife, peel the orange, removing all of the white pith. Working over a bowl, cut between the membranes to divide the orange into sections. Squeeze the membranes between your fingers to release the just then discard them. Pour all the juice from the bowl into a measuring cup, then add additional orange juice to measure 1/3 of a cup."
I stared at this paragraph for like 10 minutes trying to figure out what they wanted me to do. I understood vaguely, since one of the benefits of this cookbook is the full-color photograph of the dish on the facing page. I gathered that I was to remove the "membrane" from the sections and preserve the intact fleshy sections of the orange to top off the chicken, but when I read the directions, that didn't come across at all. I think they left out a sentence or something. So I was kinda on my own for the orange part.
Not to mention how difficult it was to preserve that intact fleshy part of the orange sans membrane. It was impossible. Maybe it's because I was using a honeybell orange, rather than the navel orange it called for. I don't know. I just know I got a lot of juice all over my hands and not along of orange.
So lets just pretend none of that ever happened. I'm going to reconstruct this recipe the way I think it should have been written. Needless to say, the dish was pretty good.
Rosemary-Orange Chicken over Spinach
paraphrased from Preventions Ultimate Quick and Healthy
Serves 2
1 large orange
1-2 TBS orange juice
2 tsp olive oil
2 tsp balsamic vinegar
1/2 tsp dried rosemary
1/4 tsp brown sugar
pinch of red pepper flakes
2 thin boneless skinless chicken breasts
salt and pepper to taste
1/2 lb spinach, washed with stems removed.
1) Zest 1/2 tsp orange zest from the orange and set aside.
2) Slice orange in half lengthwise. Take one half of the orange and peel it carefully with a paring knife, removing all white pith. Separate the orange into sections and carefully slit the membrane along the back and inside of each section. Slip the paring knife under the membrane and slide it along the inside to separate it from the flesh, then peel off the membrane. Set sections aside.***OR
Take one half of the orange and cut it crosswise into four to six slices so that each slice has sections. Then cut flesh away from the rind. Set these sections aside for garnish.
(I hope at least one of those made sense. Let me know if it doesn't work)
3) Juice the other half of the orange and pour the juice into a measuring cup. Add additional orange juice as needed to reach 1/3 of a cup
4) Add zest, 1 teaspoon of oil, vinegar, 1/4 teaspoon of rosemary, brown sugar, and red pepper to the orange juice. Whisk together and set aside.
5) Sprinkle the chicken with the remaining rosemary, and salt and pepper. Warm remaining teaspoon of oil in a large, non-stick skillet until hot. Add chicken and sauté 2-3 minutes per side, or until a nice golden brown and cooked through. Transfer to a plate and cover loosely with foil.
6) Add spinach to the pan and stir-fry over med-high heat for 1 -2 minutes or until just wilted (add a little oil if the spinach starts to burn).
7) Portion spinach out on each plate. Place a chicken breast on top of the spinach, then place orange sections on top of chicken. Whisk dressing briefly to reincorporate, then pour over chicken and spinach.
***UPDATE: Obviously this is a learning process. Thanks, anonymous commenter, for this handy link! With the photos it makes so much more sense. I would follow these step-by-step instructions rather than my mangled version above.
Wednesday, April 16, 2008
Key Lime Pie

For Mr. Heart and mine's one month anniversary of dating, I decided to make him a homemade meal, despite the lack of resources available to us in the college dorms. In fact, the dorm room I had at the time did contain a kitchen. However, I had moved into it halfway through the school year and the previous tenants (and my new slob of a roommate) had never once cleaned the kitchen and instead, every surface was covered with pots, pans, boxed food stuffs, and layers of grime.
So to prepare this meal, I hijacked the communal kitchen in a friend's dorm and used their room as a preparation area. The piéce de resistance was to be a scrumptious key lime pie. The recipe I was using was not the one that is below. Instead it was one that required beaten egg whites and 6 hours chilling. That's right folks, I sat on my friends dorm room floor the day before our one-month anniversary, beating egg whites to stiff peaks, with a fork. Do you know how long that takes? That is how much I love my now-husband.
So after a million years of beating eggs and juicing limes and the whole hullabaloo, I put the pie in the communal dorm oven. I let it bake the alotted ten minutes. I go to remove the pie only to discover there are no dishtowels/oven mitts/pot holders anywhere in the vicinity. There are only paper towels. So I wrap my hands in paper towels and hope for the best. I try to quickly grab the pie and transfer it to the stove top. This fails. I drop the pie. Half of it remains in the pie tin. The other half splatters all over the communal kitchen wall. I, who rarely curses, let out a very nasty curse/howl of frustration. And this was just supposed to be dessert!
However, I loved Mr. Heart very much. This is how much I loved him. I went out, bought all new ingredients, and made a second pie. It only got 4 hours to chill and was, hence, like key lime soup, but still. Love folks. The guy still married me. Oh, and the friends who lent me their dorm room and mini-fridge said that the half decimated pie, which had had a full 24 hours to chill, was divine.
When I explained all this to Mr. Heart tearfully over the key lime pudding disaster that was pie #2 he sighed, smiled, and told me he had a much simpler recipe that required no beating, only three ingredients (plus a crust) and hardly any chill time. Actually he said "My mom's recipe doesn't require egg whites." But lets pretend he hadn't just compared my puppy-love attempt at pie to his mother's.
So here is Mr. Heart's super-easy, always reliable, very tasty recipe. It may look similar to the recipe for key lime pie found on the back of various jars and bottles for this very reason. If you can get your hands on some key lime juice, trust me, it makes all the difference. The key limes add an extra zingy sweetness. Heck, if I was hanging out in the warm sun of the Florida keys all the time, I'd be extra zingy and sweet too.
Key Lime Pie
Serves 6
1 can of sweetened condensed milk
3 egg yolks
1/2 cup key lime or regular lime juice
1 pre-packaged graham cracker crust
1) Pre-heat oven to 350ºF
2) Combine the first three ingredients until smooth. The filling will be a pale yellow (No, key lime pie isn't actually green).
3) Pour filling into pie crust. Place in middle rack of oven and bake for 10 minutes or until set.
4) Remove from oven and allow to cool for 15 minutes.
5) Chill for at least 1 hour (warm key lime pie is no fun). Serve with whipped cream!
Ps. Mr. Heart now wears the pie-making-pants in our household. Mmm.
I Heart... Rice Crackers

There are few foods that I could eat, non-stop, for the rest of my life. This is one of them. These were always a treat during my childhood because I could easily have consumed (still would!) the entire package in one sitting. One of my favorite late night snacks was (is!) rice crackers, cheese, and left over roasted chicken. Mmmmm. Nothing like it after a long theater rehearsal or evening class.
This particular brand of rice crackers is, by far, my favorite. They are light, with a crisp crunch, a hint of salt, and the sweet nuttiness of sesame. Other brands, I've found, tend to go heavy on the seasoned salt, and the plain KAME crackers, are, well, a little plain. The sesame variety has a nice balance that. I. can't. get. enough. of.
The other great thing about these crackers is that, as far as crackers go, they're fairly good for your (or at least not bad). Gluten free, low salt, almost no fat or calories, I don't feel guilty eating, say, a quarter of the package at a time. Though maybe the fact that I eat it with slivers of sharp cheddar cheese, negates the health benefits somewhat!
Tuesday, April 15, 2008
Gnocchi with Asparagus and Pancetta

Homemade gnocchi and I have a history of failure (a story for another time). So when Cooking Light's trio of gnocchi recipes only required the store-bought variety, I jumped at the chance to have successful gnocchi in my home kitchen without the grief off boiled blobs of mashed potatoes.
We tried both the Gnocchi with Chicken Sausage, Bell Peppers, and Fennel as well as the Gnocchi with Asparagus and Pancetta. The former was okay, but was severely-lacking in flavor, despite it's myriad of interesting ingredients, probably do to it's lack of sauce (perhaps uping the liquid content would help), though the fennel was an interesting touch. It's a recipe worth revisiting and modifying. The latter was delicious, though we went a little overboard on the pancetta (a little goes a long way my friends).
Gnocchi with Asparagus and Pancetta
from Cooking Light, with slight mods.
Serves 2
8 oz. pre-packaged (or fresh) gnocchi
1 oz. pancetta, cut into thin strips, about 1/4 cup (I put in, like, 3 oz. which was overpowering)
1 thinly sliced shallots
1/2 pound asparagus, trimmed and cut into 1 1/2-inch pieces
1 tsp minced garlic
1/2 tablespoon fresh lemon juice
salt and pepper to taste
2 TBS grated Parmesan cheese
1) Cook gnocchi according to package directions. Drain, reserving 1/4 cup cooking liquid. Keep warm.
2) Heat a large nonstick skillet over medium-high heat. Add pancetta and sauté 5 minutes or until crisp. Transfer to a paper towel–lined plate.
3) Add asparagus to pan; sauté 5 minutes or until tender. Add shallots and sauté until translucent, about 3 min. Stir in garlic; sauté 1 minute. Add gnocchi, pancetta, 2 TBS reserved cooking liquid, juice, salt, and pepper to pan and cook an additional minute or so until flavors are mingled and the dish is warmed through (add more reserved cooking liquid if pan gets too dry). Divide among boths and top with cheese.
French Dip and Beef Barley Soup
When I saw this recipe for a slow-cooker French Dip on Baking Bites, I knew I had to give it a try. So I made it as a super-secret-special surprise for the Mister because he's big into the au jus. This was eaten so quickly, I was unable to photograph it.
Then, when I was perusing the comments on allrecipes for a similar recipe, I found that many people had turned their leftover beef and au jus into beef barely soup. Two meals in one! So I made sure to keep the amount of broth the same, even though I got a smaller cut of beef (there are only two of us, after all).
I added probably more barley than needed (as you can see), about half a cup. A quarter of a cup would easily do. You can cook it right in the broth. I tossed in some frozen peas at the end. This would be divine with delicious chunks of potato as well.
Slow-Cooker French Dip
courtesy of Baking Bites, with slight mods.
Serves 2 (with leftovers for soup)
2 -2 1/2 lb beef chuck roast or brisket
2 cans beef broth
1 can condensed French onion soup
6 oz. red wine
1 tsp garlic powder
salt and pepper
2 french rolls (we used small sub rolls... not quite authentic)
2 - 4 slices of provolone cheese
1) Trim excess fat from roast and season with salt and pepper.
2) Pour beef broth, French onion soup, wine, and garlic powder into slow cooker. Place roast in liquid.
3) Cook for 4 1/2 - 5 hours on high, until falling apart tender.
4) Remove roast from slow cooker and allow to rest under tended foil for 10 -15 minutes. Slice thinly across the grain, then return meat to slow cooker for an additional 30 minutes on low (this step was ingenius, Ms. Baking Bites, the meat came out succulent).
5) Lightly toast rolls and lay 1 -2 slice of provolone on each. Fill each roll with sliced beef and serve the jus on the side in small bowls. Eat while it's still hot!
6) Package the beef seperate from the broth for storage. Or make your beef barley soup right away!
Beef Barley Soup (ala French Dip)
Serves 4 - 6
remaining broth from French Dip (see above)
remaining beef from French dip (see above), chopped or shredded
1/4 cup barley
1/4 cup froz peas
1) In a large pot, bring broth to a boil. Add barley and lower the temperature to a simmer. Cook covered for approximately 1 hour (or according to package directions) until barley is tender.
2) Add beef and peas. Cook 10 -15 minutes more. Serve with crusty bread.
**Note: This soup is way better than the somewhat less inspiring William-Sonoma version attempted previously.
Sunday, April 6, 2008
Homemade Flour Tortillas

Every once in a while, I can get Mr. Heart to contribute to the cooking process by either integrating something he'd be interested in making (usually baking)/eating or by putting on my sad puppy face. With homemade tortillas, however, I didn't have to pout too much. He had been disappointed with store-bought tortillas being too thin and dry and cracking when rolled. This recipe came out pretty well and was very simple. My only complaint was that the tortillas were a little on the thick side--we don't own a tortilla press--so be sure to roll these as thin as you can. They were also quite filling. I found one taco to be plenty sufficient.
Flour Tortillas
Makes five 8-10" tortillas
2 cups bread flour
1 teaspoon baking powder
1 teaspoon salt
1/2 cup vegetable shortening
3/4 cup hot (115º to 130ºF) water
1) Mix all ingredients together by hand or on low speed until dough comes together.
2) Knead by hand or with the dough hook on low - medium speed until smooth, ~4-6 minutes.
3) Divide dough equally into 5 parts (or more for smaller tortillas) and roll into balls. Let rest for 20 minutes.
4) Roll out each ball into 8 - 10" round, as thin as possible (~1/8" thick).
5) Heat a large non-stick skillet over medium heat. Once hot, slide a tortilla on to the skillet one at a time, cooking until brown spots appear, about 30 seconds on the first side. Flip and cook about 15 seconds on the second side. Repeat with remaining tortillas.
6) Cover cooked tortillas while cooking the rest. Serve warm.
We used our tortillas with this taco recipe, but using ground turkey instead of beef. yum!
Friday, April 4, 2008
Strawberry Banana Smoothie
 No excuses, that's my motto.
Mr. Heart has perfected the art of my favorite smoothie! When we first began the smoothie escapades, with no knowledge as to the art of smoothie preparation, we started with just frozen berries. This came out far too chunky and jammed our blender something awful. Obviously, we were missing the critical liquid component. Orange juice was tried, but for me at least, it over powered the other flavors. Then we tried strawberry yogurt, which was on the right path, and then finally, vanilla yogurt. A splash of apple juice to up the liquid content and voila!
This general formula can be used for other flavors too! We've also experimented with peach/blueberry and blueberry/cinnamon!
Strawberry Banana Smoothie
Serves 2
1 banana, broken into chunks
1 cup of frozen strawberries
2/3 cup of vanilla yogurt (one single serving container does the trick)
2/3 cup apple juice or cider
1) Combine all ingredients in blender. Pulse until smooth and thick!
Subscribe to:
Comments (Atom)
